Total Pageviews

Thursday, 7 June 2018

For Those Who Get Confused Or Plain Just Do Not Know

Daler-Rowney, Bristol Board and How To Correct Mistakes on the Page!

Yes, I am fully aware that in my post on the type of implements to use for drawing comics I never touched on drawing paper.


In the old days publishers used to supply Bristol Board for artists to work on. Publishers supplied the board so it was theirs -the artist was paid to "just" draw. And that tended to be more durable when stored and, uh, purloined by the new generation of self professed "hot shot editors".

Bristol Board is an uncoated and machine-finished paper board named after the city where it was originally produced…my city –Bristol.  The Board comes in two key finishes - vellum or smooth (or sometimes “plate”).  There is an engraver’s finish which is more for printing engraved stationery and not commonly used amongst the old artists for various reasons..

There are –I keep having to stop myself from writing “were”!-  several thicknesses of Bristol Board ranging from One-ply (basically along the lines of the thickness of printer paper) and Two-ply which is more like a card stock and both firm but foldable. Three-ply is rather more like a rigid board and this tended to be what you would see publishers use, or, rather, the artists use. There used to be “beginners confusion” because, some times, rather than being sold as Two or Three ply, the board would be sold by weight and “weight” refers to the weight of 500 sheets of a paper in question. The 100 lbs Bristol Board was a fairly popular and versatile version.


Now, typically, artists would use the firmer types of Bristol Board for finished work whereas the thinner type would be used for printing or publications. Let’s face it, if you had to post in your artwork then you wanted to make sure it was well packaged but also not drawn on paper stock that would tear and crease easily.  Even in the 1980s I met artists at Fleetway ands Marvel UK who always travelled in to deliver their art -you draw 20 pages you do not want to hear they are irreparably damaged or lost because even Registered mail had no guarantees.
 
But not everyone used Bristol board.  Some used Daler-Rowney drawing pads because the paper was generally tough and durable and nice to work on.  However, if you had to count pennies then it could be expensive.  I often wonder how the art implements I use today would work on Daler-Rowney pads (if I remember there were different grades) because what I used to draw back then is not what I use now. There you go –Daler-Rowney how about sponsoring a post looking at the pads you produce today?  (That will happen the day I win the National Lottery –and I never gamble!)

At the old Westminster Comic Marts back in the 1980s, as you entered the foyer, if you looked toward the stairs on the right, you might see a group of very odd people who were stroking and generally fondling paper as well as seemingly microscopically analysing anything drawn on said paper.  That would generally be Tom Elmes, John Erasmus, Paul Brown and myself.  If one of us was using a new type of paper everyone wanted to know whether it was Rough, Medium or Smooth textured. How did a pen work on it? What sort of pen –what was the nib like?  Of course, at one point Mr Brown started using expensive C10 paper which was very smooth and pens/brush “just glide over it” –can’t remember who made the comment “Smooth as your nuts after a close shave”….would I?!

However, we found that photocopier paper was a very good material –it was designed to be printed on after all and certain makes (at that time) were a bit rough but generally speaking copier paper was smooth as a baby’s bum  -can we still say “smooth as a baby’s bum”?  Let me check with Black Tower Legal……yup. We’re covered….unlike that smooth baby’s bum….how do I get into these things?

You got around 24 A4 or A3 pages on a Daler-Rowney pad and that was about two times more in cost that a ream of copier paper-500 sheets of paper.

When the eye sight in my left eye got worse I realised that it was impossible to balance things out on an A3 sheet of paper so I had to go from drawing direct onto A3 and draw panels on A4 that were then cut and pasted onto A3. This seemed a little depressing until I realised that it meant, even if you were not the world’s greatest artist (I am soooo modest) you could play around with layout and design. Paste panels onto an A3 sheet and occasionally you saw there was too much space left blank on the page.  What a waste!  Then your creative side thinks of something to add –when you draw straight to paper with no scripts or idea of how a story is supposed to run and end just that little addition can totally change the direction you are going in.

Anyway, during the Second World War, publishers had to print on whatever paper stock they could get hold of –silver paper, wrapping paper –anything.  Those were the days of no photoshop or scanners.  Ben R. Dilworth, in the 1980s, experimented with printing onto brown wrapping paper, water colour paper and other paper stocks. When it came to the legendary Previews Comic I published we both decided that to give the publication a different look we would use cans of car spray paint to add colour to the interior covers that showed through the clear acetate covers we painted a design on. And remember none of this was scanned but had to be fed through a photocopier and that included the acetate covers –something Dilworth pioneered with One Bright September Evening.

I was talking to Steve McManus in his office one day and he showed me some pencilled pages he had been sent and there was some problem as I recall and I asked what happened if the inked pages never turned up.  He pointed at the new “computer” thingy on his desk and told me you could do a lot to make those pencils publishable now.

And this is the point: in 2018 you can draw on a paper handkerchief if you want. So long as you can scan it and clean it up using Photoshop it is publishable.  I only use the computer for one thing when it comes to comic work and that is the lettering –my eyes and especially my hands made it clear a long time ago that I was never going to be a letterer and though I like real hand written text but as I can’t pay someone to do that then, like everything else, I have to do that myself.

The idea that you have to have the post expensive drawing implements –I note a lot of newer zine folk use fibre tip pens now- is a fallacy as I pointed out in the other post.  That you have to use the most expensive cartridge paper you can get is also false.  You draw, scan and send jpegs or whatever to the publisher or your printer. At no point is someone going to get back to you and say “What on earth did you draw this on –a paper handkerchief??”

There are certain very cheap imported drawing pads meant for kids that you can use but some of these are using recycled paper and though the greyish/off-white colour is no problem because you can adjust all of that during scanning, some sheets have brownish or darker flecks in them and unless you want to spend hours cleaning these up after scanning I would avoid that paper.

Then you have the question of how to correct mistakes on the page –or stains, ink drops whatever.  You can, if it is your work and not a commissioned piece, just go with it. “Go With It” involves incorporating that spill or ink spatter into your work. Turn it into a cushion on a chair, the blacked out back of a chair or any other object. Be inventive.

The other method is “cut and paste” which might be easier in some cases. Say you have drawn a character but you accidentally brush your hand across the face before the ink has dried –pen smear ain’t pretty.  I am not joking when I tell you that I have seen artists scrap an incredible page of artwork because of this. 

One small accident and hours of work is thrown out and the page starts from scratch again. If you are in any way professional about your work (even if you are not the greatest artist you still try to set yourself a standard) then you know that starting from scratch is no good. It eats up time and can stem a creative flow. If you are working to a schedule for say a publisher or even to get a book ready for launch at a specific event them you have no time to be a prima donna –you are committed. Do not be a poseur or dilettante.

Here is a personal example.  Back in the 1980s I had promised London editions pages by a specific date. It was about 03:00 hrs and I had almost finished and then realised that there was a blurry ink rub over a character in one panel. I had been working quickly and my had had rubbed over the not yet dry ink. I threw the page aside and started anew.  It wouldn’t work. I tried to copy the panels I had drawn but they were not working. I tried everything and was failing. By 05:00 hrs I decided all was lost unless…what would happen if I re-drew the character on a scrap of paper and glued it over the spoilt panel ?  I did just that. It seemed to work.  When it came to photocopying there were some “ghost lines” –the edge of the piece of paper I had stuck on being picked up by the copier.  Quick dab of Tippex over the ghost lines and photocopied and it looked okay.

Now, the publisher never used the pages but you expect that from publishers because they ain’t professionals –they only want the money. But when people saw the original page after the copy they were surprised.  I, like many other artists, had panicked over nothing.


Over the years I have used the “Go With It” and paste-on method a,uh, “few” times.
Others have used a Sand Eraser which, to be honest, having tried once, I would never recommend.  With Bristol Board or card artists use to use Exacto knives to remove errors or ink spots. Time-consuming and with the ability to easily correct during scanning I would not, again, recommend that method. Oh, if you use copier paper and use either method….watch your paper vanish!


Then you have Process White or White Out and inking over something is a common method used by artists and calligraphers and if you are unfamiliar with White Out then it’s just a thick concoction of white liquid used to mask mistakes.  Some recommend Process White Lead, or acrylic based White Out or even artists Gesso –used to smooth canvas and other surfaces by painters.


But there is a cheaper and just as effective a solution –a tube of White Gouache paint but by far the cheapest and most commonly used (except by art snobs) is the good old Tippex fluid.


The Tippex pen is good for correcting smaller areas while the little pot has a wedge shaped ‘brush’ for larger areas.  I mentioned this to other artists in the 1980s after meeting a rather well known fine artist who showed me how he corrected mistakes using Tippex.  Apparently, everyone knew about using Tippex “because it’s cheap and does the job”.
 
So there you go –what to draw on and how to correct mistakes you make.  Another free Hooper Comics Master Class!

Wednesday, 6 June 2018

Ultra-Updated: Berol Pens, Sharpies and the Drawing Essentials


When I first wrote this post it was the early 2000s. I've up-dated it a few times since and I have had to drop and change implements as things change.  If  Berol, Sharpie, Spirograph or any other art related company would care to sponsor CBO just get in touch!

My hands are now such that using Chinese brushes is difficult ( I LOVE these brushes and first started with in the mid-1980s after picking some up in China Town (London) while visiting Fleetway and Marvel UK.  Well, no more business trips since the comic industry died and when my old Chinese brushes eventually reached the end of their work lives I purchased a set of Crimson and Blake Chinese brushes from an old Chinese supermarket in Bristol...ten years or more ago.


I just realised it was much longer ago than ten years!!

Here is my article as published in 2016 and I'll update as I go.

Comic Artists and What To Draw With -Berol, Uni Ball and Rotring Tikky Graphic

Okay, you see an artist uses pure sable brushes or this tech-pen or that one -all very highly priced.  The thing is that unless you are rich or have stepped right into a very well paid long term art job you are wasting money.  For an artist every single penny counts and job security is …well, not something artists get very often! (I have no idea whether I was being sarcastic there -comics and job security??).

I have used Rotring pens (over priced and not great -this was in the 1980s), Guillotte nibs, caligraphy pens and even the very cheapest fibre tip you can get. I HAVE used brushes and still do but mainly for inking in large areas or effects. I used to go to the old Westminster Comic Mart in London and visit China Town to buy cheap brushes and b-i-g bottles of black ink.  I am not joking about big bottles of ink. A bottle would cost under £2.00 which is what you could pay for a 14 ml Windsor & Newton bottle of black ink. Take a look at this -the label went years ago but think of the amount of ink and that saved an artist a LOT of money (I think the bottle last 4 years).


However, if you try Berol you can find Broad and Fine tips but also Handwriting pens that allow you to draw using an even finer line.  You can do almost everything the very expensive pens can and quickly.  The only thing I would say is, once you’ve inked art using a Berol pen give it time to dry and do not try to erase pencil lines straight away as it can smudge.

Since the 1980s I have (despite the fact Berol seem to be harder to find in Bristol) used various pens but the main ones have been Berol Fine and Broad -the line is so good (until the tip wears down and even then are still good) that other professionals have sworn blind that I am using brushes!  And when I say “use” them I mean a lot -the last little stationer I used sold me the pens in the boxes at a discount after the owner saw me looking at the pens and said “You’re an artist, aren't you? You can get a trade discount”! (Was it so obvious -must have been the tatty clothes and hungry look!)

You can also take Berol pens around with you for sketching.


The colour Berol pens I have had little experience with as they are harder to find. However, I knew one artist back in the 1980s (Paul Slydel) who only used Berol colour pens to colour and when I first saw his work I thought he had been using brushes and colour inks.  Hard to find these days and if you do the price can be high.
Image result for Berol black Broad tip pens

You have to find the bloody pens first but I’ll come back to that in a while.

 At the moment there are a selection of pencils/pens on my table because I do like experimenting a bit -the joy of being your own publisher is that you can do this. However, the main items I use are these:


 There is the Uni Ball “Eye” which is about 0.5 despite saying “Fine” and most “fine” pens you’ll find in stationary shops and W. H. Smith are 0.5 which is not what I call fine at all.

In fact, the Berol Fine is about 0.3 when new but after usage will get to a 0.5 line but the good thing is, if like me, you live in a cluttered working area with LOTS of brushes, pens and pencils, if you lose your Berol Broad -good for filling in large areas of solid black though BIG areas of solid black I still use brush-ink, then the Fine can handle the Broad’s job!

The effect? Well, I tried drawing with a migraine the other day (the current weather is **** up my head) and my eyes…yeuch.  But I did a rough for a cover I wanted.  Yes, I can see the faults in the illo but no one is perfect and I’d not use this one any way!

I posted it on Face Book and another site and then came the comments -was I using a “dip-pen” (Guillotte nib)? What type of brush was I using?   I explained but some still think I’m joking. Seriously, this was all Berol Fine.

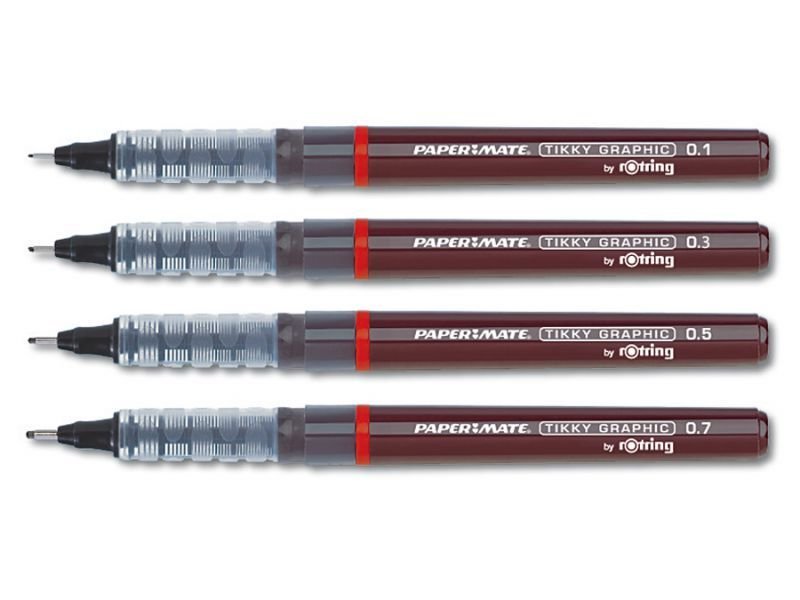
 I did, at one point, use Papermate Rotring Tikky Graphic -these are designed by Rotring but came in a pack of three -0.3, 0.5 and 0.7 -a nice range of nib sizes though I would have loved a 0.1 and 0.2 combination as well.  The three pens cost about £4.95 in Summer 2011 but have currently hit £7.90-£8.00 in Tesco and other outlets so, for me, that is getting too pricey.
Image result for papermate-tikky-graphic-rotring-lichtbestaendig

There were problems with these pens. I bought about three packs in 2011 and I found pens from different packs began seeping ink from them -just by the red seals you can see in the photo above.  Now, unless they are clogging like the old Rotring pens (and you wonder why so many artists stopped using them?) then there has been a problem in filling them during manufacture. Each 0.7 from two packs got two uses out of them and then…no ink.  This also happened with all three 0.3s which really **** me off. What also annoyed me was that in all the packs I purchased the nibs fell out of the 0.1 as soon as it touched paper.

For, now (2016), £8 a pack of three I just simply would not recommend them. Put it this way, okay, they look sleek and well designed, but a Berol Fine, used properly can do the job of all three -skillfully used the Broad could replace the 0.7 if you had to.

“Spatter” effect.  No, I do not use a computer created effect (NEVER!!!) it is the traditional old way -ink on toothbrush and careful use of the thumb to get the spray right -experiment if you want to try this BUT make sure everything is covered up first and that includes other panels of art on a page you are trying it on!!!  Bit of advice: some of us used to blow onto the brushes  to make the ink splatter out -it'll make you dizzy so stick to thumb on brush!


At the moment I have a big tub of about 50 pens -if you work like me then use a pen. Put it down. Lost,. Next!

 A better view from the side!

These the basics I use:left to right -Uni Pin Fine Line with nibs 0.05/ 0.1/0.2/0.3/0.5/0.8.

Pen #7 is a Pilot Marqueur A Dessin 0.2.

The next a Uni-ball Eye Fine.

Then the Luxol Micropoint 0.5.

The legendary Berol Fine (blue) is next followed by the Berol Broad.  

Now I do have a big tin full of all sized brushes mainly for large solid black areas but you then have to wait for the ink to dry.  So, for speed, that big chunky grey pen is a bog standard Permanent Marker -Berol did them but they are far too pricy.  You can pick these up for 35p each or even packs of four for £1.00.


Nice effects can be achieved with biro pens but that is something you’ll find out eventually through experimentation.

Also, I have used Spirograph effects.  Enlarge them or same size.  Nice results.  In fact, last time someone asked me how I achieved certain effects in an interview people started going out buying sets!  Mad but...


Now, such is Room Oblivion that I have lost all my Spirograph wheels.  They are here but where I have no idea. I was about to order a new set when my sister returned from shopping and carrying a 1965/1966 Spirograph set -complete for £2 from a charity shop. The box is not in perfect condition but these can fetch up to £29 on Ebay.

Lovely photos of the set:
 All seems to be present and correct
 Interior box lid showing the various wheels and what effect they achieve
 There are extra wheels and I forget to put two of the smaller wheels into this display but they are there with the other parts.
 More instructions
 These instructions make what you get today seem almost for dim-wits. This is good stuff and no wonder it won a prize!


 I had to check this several times before I could believe it.  The original Spirograph paper (divided into squares) in wrapper!
 More guides.
 The original base board (thick piece of cardboard) is still there!
 Oh yeah, this may get a lot of useage!

Never ever be afraid to try odd things to see whether they work for you. The computer for a real hands on artist should always be the very last resort for special effects.  Maybe if they had used Spirograph those people who claimed "This is done on the computer!" would know better.  After 40 years Spirograph is still a good tool for me to use.

But as freelance artists tend not to make a lot of money they need to keep costs down so Berol pens are perfect -as are various nib sized gel pens.

Back in the 1980s-late 1990s you could not walk into a supermarket, newsagents or other store without seeing the tubs of Fine and Broad (black as well as the other colours) but today..  Saturday morning I went into W. H. Smith in Broadmead, Bristol and was astounded at what little selection in pens they have -all sorts of brands and prices but generally all 0.5! There was a big  (b-i-g) box of Berol colour pens but at the price Smith’s were asking (I think £20 plus) I didn’t even consider them.  But Broad and Fine black? No. Not one.

In fact, I spent around an hour looking around City Centre shops -not one Berol pen in sight.

This is a great pity because I think that for a working cartoonist/ comics artist/ illustrator there are no better pens. I’m told Berol may no longer be making Fine or Broad pens but as this only came from two store owners who did not seem interested or, at first, know what I meant, I’m hoping they are wrong.

In fact I can add an up-date to this item.  Everyone seems to be stocking Sharpie pens and they are relatively cheap but I hate them.  Firstly, they smell!  Secondly, with fat nibs they are nowhere near as versatile as Berol pens.  A Sharpie cost 65p. A Fine Berol pen set me back £1.00!!!

Berol produce excellent products but they do not seem to be pushing them at all.  Who ever is in charge of promotion and sales -bad job.  Over thirty years I've championed and recommended Berol pens and I still do and it's great to hear budding artists have tried them because of recommendation

Berol needs to get on the ball because I would hate to see those Sharpies be the only pen out there!!

And, yes, I asked Berol twice whether they might sponsor some features on CBO about their pens -supplying a selection so their use could be demonstrated.  Nothing. Not a word.

I have known any number of artists who have no idea how to use a pencil or pen on paper. 90% act very superior to you when you say you are what they call "old school"...but then you have to put up with their nervous breakdowns when their computer or tablet or whatever they use crashes (and they have not saved their work on external storage devices). If you cannot use a pencil, pen or brush and use your hands to draw on paper then you are NOT an artist. You may use a computer to 'draw' but storing up images to copy and paste onto new work because it saves time is without real soul -it's letting the device do the work.

Where's the challenge?


(c)2018 Terry Hooper-Scharf

Thursday, 10 May 2018

Journey Of The ID:The Dr Morg Trilogy


Journey Of The ID:The Dr Morg Trilogy
Terry Hooper-Scharf
Paperback,
52 Pages  
B&W
A4 format       
Price: £8.00 (excl. VAT)
Prints in 3-5 business days


Metapsychophysics meets comics.

It’s the next natural evolutionary step in comic books!

Are you prepared to have your mind expanded?  Are you really prepared to discover whether you are one of the Brotherhood of Dreams?  Are you ready to have your eyes bulge, your ears pop and your bowels expand??

For the first time all three parts of the highly acclaimed Dr. Morg Trilogy are combined into one volume: WWW (Words Within Worlds), After Orwell and the final explosive The Death of Dr Morg!


Can three men connected by one scientific project truly be witnessing the end of everything?